
Introduction to ArUco
Building an AR Marker Detection program using ArUco Library
Introduction to AR using ArUco
While the current MR development revolves around hardware such as phones with depth sensors, Microsoft HoloLens, or HTC Vive, novices shouldn’t be undermined from the learning experience. Thanks to open source alternatives such as OpenCV and ArUco library, novices can develop AR apps using webcams for image input.
Pre Requisites
- A desktop or laptop with webcam
- Setup ArUco on device. Refer my previous post
- Familiarity with OpenCV in C++. Refer the official website for tutorial Although I tried it on linux, windows users can google build commands
Why ArUco?
The official docs state,
ArUco: a minimal library for Augmented Reality applications based on OpenCV
Unlike recent libraries such as Unity, ARToolkit and SDK’s such as Google’s ARCore, ArUco offers easy setup and deployment. With just a few lines of code, one can develop an app for AR Marker detection and simple object rendering. Its suitable for beginning your AR journey — fast.
Jump Start to the code
- Start the webcam : Create a camera capture object that queries the device for live video.
// Read the web cam
CvCapture *capture = 0;
capture = cvCreateCameraCapture( 0 );
- Grab image from the webcam : OpenCV handles images in various formats. The simplest of all is a Mat object, storing images as matrices of their color values(RGB). Use the camera capture object to get the image from the webcam
//read the input image
IplImage *image = 0;
image = cvQueryFrame(capture);
// Gotta cast the image to Matrix
// Remember all computations are in Mat form,all visuals aren't so
cv::Mat InImage;
InImage = cv::cvarrToMat(image);
- Detect and Highlight the markers : ArUco employs special markers for object detection and pose estimation. These are lightweight squares that carry bits of information. For quick build, you can use ArUco’s inbuilt function draw to highlight the marker. First parameter is the image, Scalar(0,0,255) decides the boundary outline color(green in this case) and last parameter is the boundary width.
//Ok, let's detect
MDetector.detect(InImage, Markers);
//for each marker, draw info and its boundaries in the image
for (auto &Marker : Markers) {
    cout << Marker << endl;
    Marker.draw(InImage, Scalar(0, 0, 255), 2);
}
The official repository provides a marker grid board in pdf format.
A 4x4 marker grid board. Credits : pokemonaaah.net
- Display Loop : Finally, display the image and set the program in a loop so as detect markers in live video stream. To stop, you can add a break condition.
// start the loop
int key=0;
while(key != 'q') {
    // do the loop
    cv::imshow("in", InImage);
    key = cv::waitKey(1); //wait for key to be pressed
}
Building The Program using CMake
Note that unlike traditional programs, opencv programs (or C++ programs in general) require you to link source code to libraries you want to use. So you’ve to use tools such as CMake for a variety of purposes, namely
- To generate object files or executables
- To link source code to libraries
- Maintain project details(metadata, version, author)
- Include header files and other source code
- You will use a simple CMake script to build your project now. I won’t explain it much(refer the official tutorial). Create a text file CMakeLists.txt in the current directory with contents :
cmake_minimum_required(VERSION 2.8)
project(helloAR)
SET(CMAKE_MODULE_PATH ${CMAKE_INSTALL_PREFIX}/lib/cmake/ )
set (CMAKE_CXX_FLAGS "${CMAKE_CXX_FLAGS} -std=c++11")
# Required packages
find_package(OpenCV REQUIRED)
# Adding local ARUco Library
include_directories(pathToArUcoBuild/include/)
link_directories(pathToArUcoBuild/lib/)
add_executable(helloAR aruco_simple.cpp)
target_link_libraries(helloAR ${OpenCV_LIBS} aruco)
The key takeaway is to include and link directories appropriately. Now open terminal and start build process
cd working_directory
mkdir build
cd build
cmake ..
make
./helloAR
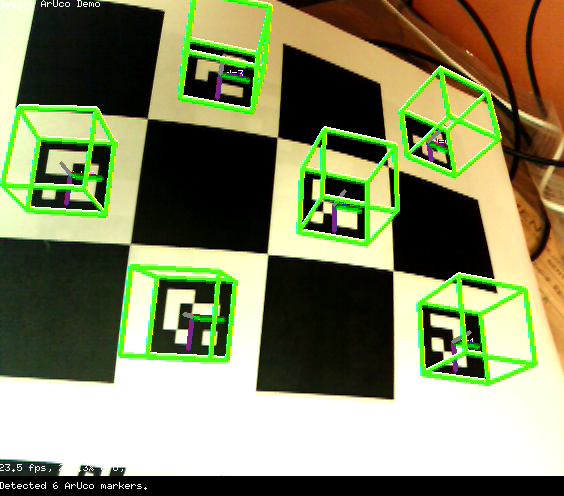
Result
Final marker detection result The build part may seem daunting at first(was for me). Using an IDE like Codeblocks or CLion will come handy as you develop more. For documentation, you can refer linux manpages (enter in terminalman cmake). You can get the full source code here.
That’s it. Were you able to develop this AR app? If yes, please leave a comment or if you have any questions.